Friday, February 18, 2011

Dell BIOS Recovery.

Hi
Here is a tutorial on how to recover from a Bricked Dell system.

Note: 
  • Out of 3 Tests conducted on 3 different Dell models (Mini, Inspiron and XPS desktop), there was a 100% Recovery rate.
  • The Recovery mite not work for you, read the Step 5 below for more info.
  • This Recovery process wont harm an already Bricked computer.

Make Sure you read the instructions first carefully.

Pre-Requisites

  • A working computer.
  • A USB Flash drive.
  • Phoenix Bios Crisis Recovery program.
  • The CORRECT phlash16.exe program - 13 versions of PHLASH16.EXE included.
  • Bios image for Dell System.
Operation - Recovery

Now that we have everything we require, lets proceed.
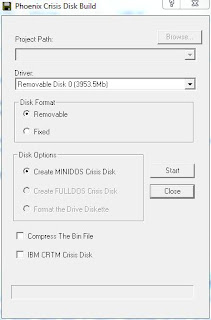
  1. Download the BIOS Crisis recovery program. Download1 , Download2
  2. Extract the compressed file.
  3. Right-Click on WINCRIS.EXE and Run as Administrator, then click on start. (If you are using Windows7 64Bit then you mite wanna run it in Compatibility mode in order for it to open.)
  4. Once a USB key is created you will find 3 files in it. BIOS.WPH, MINIDOS.SYS, PHLASH16.EXE
  5. Download the Dell BIOS update file. Extract the XXXXXX.exe file (need WinRAR to be installed on the system.) Right click on the downloaded update file and click on extract, go to the extracted folder rename the xxxxx.rom file to BIOS.WPH and copy this file to USB flash drive and overwrite. Incase .rom file is not present in the extracted folder then we are out of luck. Not all BIOS updates have .rom file specified separately, the newer BIOS installation file has .rom file embedded into .exe file. Try getting the older versions. 
  6. Once you have the USB key all ready, remove the battery and AC Adpt of the bricked PC.
  7. Plug in the USB drive. Hold down the 'End' key for about 3 secs, plug in the AC Adpt and at the same time release the End key.
  8. If you see the battery light is one with Red, wait a few minutes.(5-10mins)
  9. If the laptop restarts automatically, the recovery was successful.


If the Above process does not work. Try the following.

  1. Turn off the computer and disconnect it from its electrical outlet.
  2. Go to a different computer that is working properly, and download the BIOS update utility for the computer from the Dell support website.
NOTE: After you download the BIOS update utility, generate the BIOS recovery utility. To generate the recovery utility, you can use any functioning computer. You do not have to use a computer of the same type or model as the malfunctioning computer.
    1. Go to http://support.dell.com.
If this is your first time to use this website, complete the one-time registration.
    1. Click Downloads for Your Dell.
    2. Enter the Service Tag Number for the computer or select the appropriate Dell system.
    3. Select the appropriate OS and language for the malfunctioning computer.
    4. Select FlashBIOS Updates for the download category.
    5. Click Go.
  1. Follow the instructions on the screen to download the BIOS update utility.
NOTE: For some Dell systems, you are given a choice to create a diskette containing the BIOS update files or to download a file you can use from the hard drive. Select the choice to use the file that requires no installation mechanism, or application. This allows you to download a file that you can use from the hard drive.
  1. Go to an MS-DOS prompt.
  2. Change to the drive and file path where you downloaded the utility.
  3. Type the command xxxxx -writehdrfile (where xxxxx is the name of the BIOS update executable file on the diskette) and press <Enter>.
This generates a file with an .hdr extension, and a message appears indicating that the .hdr file has been written.
  1. Copy the .hdr file to a blank, formatted diskette.
NOTE: This diskette does not have to be bootable. All operations for the recovery utility are performed by the BIOS, and no boot files are required.
  1. Insert the diskette into the diskette drive of the malfunctioning computer. Then turn the computer on.
The computer automatically regenerates the BIOS from the diskette.
  1. Remove the diskette from the diskette drive so that the computer does not boot from the diskette the next time you start the computer.


Saturday, December 11, 2010

Fix BSOD Error Codes- The easiest way.


BlueScreenView scans all your minidump files created during 'blue screen of death' crashes, and displays the information about all crashes in one table. For each crash, BlueScreenView displays the minidump filename, the date/time of the crash, the basic crash information displayed in the blue screen (Bug Check Code and 4 parameters), and the details of the driver or module that possibly caused the crash (filename, product name, file description, and file version). 
For each crash displayed in the upper pane, you can view the details of the device drivers loaded during the crash in the lower pane. BlueScreenView also mark the drivers that their addresses found in the crash stack, so you can easily locate the suspected drivers that possibly caused the crash.

System Requirements

  • BlueScreenView works with Windows XP, Windows Server 2003, Windows Server 2008, Windows Vista, and Windows 7, as long as Windows is configured to save minidump files during BSOD crashes. If your system doesn't create MiniDump files on a blue screen crash, try to configure it according to the following article: How to configure Windows to create MiniDump files on BSOD
  • BlueScreenView can read the MiniDump files of both 32-bit and x64 systems.

BlueScreenView Features

  • Automatically scans your current minidump folder and displays the list of all crash dumps, including crash dump date/time and crash details.
  • Allows you to view a blue screen which is very similar to the one that Windows displayed during the crash.
  • BlueScreenView enumerates the memory addresses inside the stack of the crash, and find all drivers/modules that might be involved in the crash.
  • BlueScreenView also allows you to work with another instance of Windows, simply by choosing the right minidump folder (In Advanced Options).
  • BlueScreenView automatically locate the drivers appeared in the crash dump, and extract their version resource information, including product name, file version, company, and file description.


How To:

·        Once you install BlueScreenView, it automatically checks for the files in the dump folder.
·        If not check the screen shot below, click on the advanced options on top right and make sure that the mini dump folder is ‘C:\Windows\MiniDump’
·        Use the BUG check code and look it up at MSDN BUG CHECK CODES (For eg: If the Bug Check Code is 0x0000007a, search it as 0x7a)
·        OR Use the Bug Check String and Google it J
·        This tool is mainly useful for intermittent BSOD’s caused by Drivers, MEM’s, or  I/O device errors. This will save a lot of your time and will ensure proper resolution for BSOD’s.


NOTE: THIS IS NOT A REPAIR TOOL, IT ONLY CHECKS THE ERROR CODE SO THAT THE PROBLEM CAN BE DIAGNOSED APPROPRIATELY.


Wednesday, October 27, 2010

iPhone Apps !!!

Here are some must have apps for your iphone. 


VLC Media Player


VLC is a free and open source multimedia player. It reads almost every video file, yet it's very powerful and simple to use and its all about drag and drop :)...no syncing required


DOWNLOAD


X Invasion 2: Extreme Combat


This is one amazing game and guess what ??...its FREE !!!


DOWNLOAD


Virtual Table Tennis Lite


This is best one of its kind...


Adobe Photoshop Express


A photographer??..Then you should have this...


OpenFeint Game Spotlight


Free Free Free !!! With this app you'll get access to some of the best, paid iPhone games for FREE! These games are regularly .99-2.99 


DOWNLOAD


Talking Tom Cat


Want some one to talk back at ya??...try this one


DOWNLOAD


So long for now folks...more coming up :)

Access Denied to Windows7 Protected Folders

Hey guys here is a patch to fix give access to the restricted folders in windows 7, most of us would like to access such folders to manually copy iTunes data or delete unnecessary folders, just follow these steps and you should be good to go :)

Error:


Solution:

Just download the file 'Take Ownership'
 extract the .reg files and double click on 'Add_take_ownership.reg' file, click on yes when prompted.

Once thats done, go to which ever protected folder you want to access and right click on that folder, select the option 'Take ownership', a command windows would open and disappear, now you would be able to access the folder :). Refer to the preview below


Note:
For every folder you must follow the last step.

Saturday, October 23, 2010

Create Free iPhone Ringtones with iTunes [How to guide]


Hey folks here is something everyone's been asking around ,so took some time on this post

You can no create your own personalized ringtones if you follow this guide step by step

STEP 1: Download iTunes 10 from here. (these steps work with any version of itunes)

STEP 2: Setup iTunes 10 then launch it. (the screen shots are from iTunes 9)

STEP 3: Choose your favorite song which you want to make it as a ringtone.


 STEP 4: Right-click on the selected song, then select "Get Info", and then select "Options" tab.


STEP 5: Now put a check mark next to the start and stop time, enter the time in the adjacent box, make sure the timeline doesnt exceed 30secs click "Ok" (max. 30 seconds).

STEP 6: Right-click again on your favorite song and select "Create AAC version", now iTunes will create your 30 seconds segment.


STEP 7: Now choose the new 30 seconds song you created then right-click on it and select "Show in Windows Explorer" if you are Windows user or "Show in Finder" if you are Mac user.


STEP 8: Change the extension of the new 30 seconds song your created from .m4a to m4r.


STEP 9: Double click on the song, it will be opened automatically on iTunes ringtones.


STEP 10: Now simply sync your iPhone with iTunes to add your new favorite ringtone. Enjoy !


Mcafee Security Fix


Your computer is at risk: Real-Time Scanning: Off

Summary: 
This document explains what to do if your McAfee Real-Time Scanning service stops unexpectedly and the protection status changes to Red.

My Product Looks Like:
Affected Products:
VirusScan
Affected Operating Systems:
Windows XP
Windows Vista
Windows 7


Description

Your McAfee Real-Time Scanning service stops functioning unexpectedly and your protection status changes to Red. An error similar to the one below will be displayed in McAfee SecurityCenter:


Solution
Perform each of the steps below to enable Real-Time Scanning in the SecurityCenter.

If Real-Time Scanning will not start or becomes disabled again, continue to the next step.


Step 1 - Enable Real-Time Scanning in McAfee SecurityCenter

  1. Double-click the M icon in your taskbar. 
  2. Click Navigation and select the Real-Time Scanning link.
  3. Click Turn On.

    NOTE: The Turn On button will be available only when Real-Time Scanning is off.
     
  4. Return to the main SecurityCenter page and verify that Real-Time Scanning remains on.
  5. Close McAfee SecurityCenter.
If your status still shows that you are unprotected, continue to Step 2.


Step 2 - Run McAfee Virtual Technician (MVT)

McAfee Virtual Technician (MVT) is an automated self-healing tool that can diagnose and fix many problems related to your McAfee product.

Go to http://mvt.mcafee.com and follow the prompts to install and run MVT.  If MVT discovers any problems, allow it to repair those problems and attempt to enable Real-Time Scanning again.

If your status still shows that you are not protected, continue to Step 3.


Step 3 - Download and run the oas-disabled-fix.cmd utility
  1. Download and save the utility from the link below to your desktop:

    http://download.mcafee.com/products/licensed/cust_support_patches/oas-disabled-fix.cmd

     
  2. Double-click the oas-disabled-fix.cmd tool.

    NOTE: Windows Vista and 7 users should right-click oas-disabled-fix.cmd and select Run as Administrator.

    If you receive the error StopService: Unable to open service McShield via SCM (5), press CTRL+C to terminate the process.  You will be prompted to terminate the batch job. Type Y and press ENTER. Run the oas-disabled-fix utility again.

     
  3. Restart your computer and ensure that McAfee Security Center shows that Real-Time Scanning is enabled.
If your status still shows that you are not protected, continue to Step 4.


Step 4 - Check for non-McAfee security software

Other security software may cause a conflict with your McAfee products. For instructions on how to remove incompatible third-party applications and a list of many incompatible products, see TS100914.

After you have removed any incompatible software, enable Real-Time Scanning in McAfee Security Center.


If your status still shows that you are not protected, continue to Step 5.


Step 5 - Remove and reinstall your McAfee software

For details on removing and reinstalling your McAfee software, follow the instructions in FAQ article TS100507.

If Real-Time Scanning is still disabled, contact McAfee Technical Support. Go to https://service.mcafee.com and select Technical Support.


Additional Information
Running a System Restore on your computer can cause the Real-Time Scanner to become disabled. System Restore attempts to return your computer to a stable restore point from the past, but that restore point might have been created before critical updates were installed.