Hi
Here is a tutorial on how to recover from a Bricked Dell system.
Note:
Make Sure you read the instructions first carefully.
Pre-Requisites
Now that we have everything we require, lets proceed.
If the Above process does not work. Try the following.
Here is a tutorial on how to recover from a Bricked Dell system.
Note:
- Out of 3 Tests conducted on 3 different Dell models (Mini, Inspiron and XPS desktop), there was a 100% Recovery rate.
- The Recovery mite not work for you, read the Step 5 below for more info.
- This Recovery process wont harm an already Bricked computer.
Make Sure you read the instructions first carefully.
Pre-Requisites
- A working computer.
- A USB Flash drive.
- Phoenix Bios Crisis Recovery program.
- The CORRECT phlash16.exe program - 13 versions of PHLASH16.EXE included.
- Bios image for Dell System.
Now that we have everything we require, lets proceed.
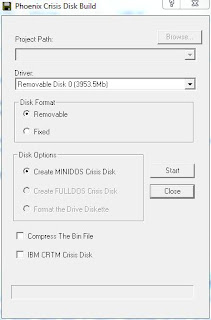
- Download the BIOS Crisis recovery program. Download1 , Download2
- Extract the compressed file.
- Right-Click on WINCRIS.EXE and Run as Administrator, then click on start. (If you are using Windows7 64Bit then you mite wanna run it in Compatibility mode in order for it to open.)
- Once a USB key is created you will find 3 files in it. BIOS.WPH, MINIDOS.SYS, PHLASH16.EXE
- Download the Dell BIOS update file. Extract the XXXXXX.exe file (need WinRAR to be installed on the system.) Right click on the downloaded update file and click on extract, go to the extracted folder rename the xxxxx.rom file to BIOS.WPH and copy this file to USB flash drive and overwrite. Incase .rom file is not present in the extracted folder then we are out of luck. Not all BIOS updates have .rom file specified separately, the newer BIOS installation file has .rom file embedded into .exe file. Try getting the older versions.
- Once you have the USB key all ready, remove the battery and AC Adpt of the bricked PC.
- Plug in the USB drive. Hold down the 'End' key for about 3 secs, plug in the AC Adpt and at the same time release the End key.
- If you see the battery light is one with Red, wait a few minutes.(5-10mins)
- If the laptop restarts automatically, the recovery was successful.

If the Above process does not work. Try the following.
- Turn off the computer and disconnect it from its electrical outlet.
- Go to a different computer that is working properly, and download the BIOS update utility for the computer from the Dell support website.
| NOTE: After you download the BIOS update utility, generate the BIOS recovery utility. To generate the recovery utility, you can use any functioning computer. You do not have to use a computer of the same type or model as the malfunctioning computer. |
If this is your first time to use this website, complete the one-time registration.
- Click Downloads for Your Dell.
- Enter the Service Tag Number for the computer or select the appropriate Dell system.
- Select the appropriate OS and language for the malfunctioning computer.
- Select FlashBIOS Updates for the download category.
- Click Go.
| NOTE: For some Dell systems, you are given a choice to create a diskette containing the BIOS update files or to download a file you can use from the hard drive. Select the choice to use the file that requires no installation mechanism, or application. This allows you to download a file that you can use from the hard drive. |
- Go to an MS-DOS prompt.
- Change to the drive and file path where you downloaded the utility.
- Type the command xxxxx -writehdrfile (where xxxxx is the name of the BIOS update executable file on the diskette) and press <Enter>.
This generates a file with an .hdr extension, and a message appears indicating that the .hdr file has been written.
| NOTE: This diskette does not have to be bootable. All operations for the recovery utility are performed by the BIOS, and no boot files are required. |
- Insert the diskette into the diskette drive of the malfunctioning computer. Then turn the computer on.
The computer automatically regenerates the BIOS from the diskette.